Basic Setup
In order to leverage any of the tools in the Faust.js toolkit, some preliminary setup needs to be done. Follow the steps below to get started.
0. Prerequisites
Before you begin, you’ll need:
- A WordPress site (local or remote), if you don’t have one yet, we recommend setting up a local WordPress development environment.
- A Next.js project (pages router), if you don’t have a Next.js project yet, create one on your local computer.
local WordPress development
1. Set up a WordPress backend and a Next.js frontend
A. Install plugins
Install and activate the FaustWP and WPGraphQL plugins on your WordPress backend site.
B. Set environment variables
Create a .env.local file in the root of your Next.js project that contains these environment variables:
# Your WordPress site URL
NEXT_PUBLIC_WORDPRESS_URL=https://faustexample.wpengine.com
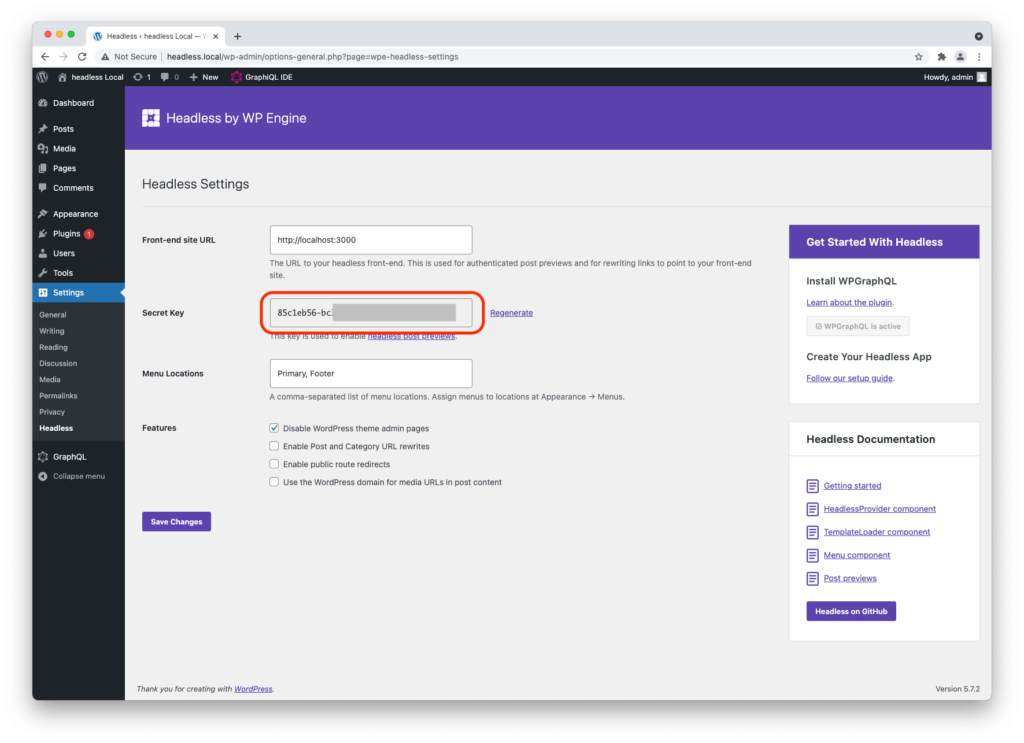
# Plugin secret found in WordPress Settings->Faust
FAUST_SECRET_KEY=YOUR_PLUGIN_SECRETReplace https://faustexample.wpengine.com with the URL for your WordPress backend.
Replace YOUR_PLUGIN_SECRET with the Secret Key found in Settings → Faust in your WordPress admin area.
Save your .env.local file.
C. Install dependencies
Install the required NPM packages in your Next.js app.
npm install @apollo/client@3 @faustwp/core graphql @faustwp/cliFaust currently supports Apollo Client 3.x. Apollo Client 4 is not supported and may break Faust integrations.
D. Create Faust config file
Create a faust.config.js file in the root of your project with this code:
import { setConfig } from "@faustwp/core";
import templates from "./src/wp-templates";
import possibleTypes from "./possibleTypes.json";

/**
 * @type {import('@faustwp/core').FaustConfig}
 **/
export default setConfig({
	templates,
	plugins: [],
	possibleTypes,
});
E. Create Faust API route
Create an API route for Faust.js to use. You can do this by creating a file in src/pages/api/faust/[[...route]].js, with the following code:
import "../../faust.config"; // Adjust path as necessary

export { apiRouter as default } from "@faustwp/core";If you’re not using a src folder in your project, you can omit “src/” from the file path above. And the same applies for other file paths mentioned throughout this doc.
F. Update _app.js file
Once the API router is set up, head to src/pages/_app.js. Add the import statements, wrap your app in the FaustProvider, and pass key={router.asPath} to Component, as shown below.
import { useRouter } from "next/router";
import { FaustProvider } from "@faustwp/core";
import "../../faust.config";

export default function App({ Component, pageProps }) {
	const router = useRouter();

	return (
		<FaustProvider pageProps={pageProps}>
			<Component {...pageProps} key={router.asPath} />
		</FaustProvider>
	);
}
2. Set up the Template Hierarchy
A. Generate types
In order for Faust.js to run the GraphQL queries it needs to determine the correct template to use, it needs to have a list of all the types available in the GraphQL schema. We’ll generate this list of types now.
In your WordPress admin sidebar, go to GraphQL > Settings. Check the Enable Public Introspection box if it’s not checked already and save your changes. Enabling introspection is required for the npm run generate command below to work.
Add the following generate script to your Next.js project’s package.json file, in the scripts block:
  "scripts": {
    "dev": "next dev",
    "build": "next build",
    "generate": "faust generatePossibleTypes",
    "start": "next start",
    "lint": "next lint"
  },
Run npm run generate on the command line. Confirm that a possibleTypes.json has been generated in the root of your project.
Be sure to enable WPGraphQL introspection before running the npm run generate command since it is disabled by default.
B. Add a template
Create a new src/wp-templates folder (or add the /wp-templates folder in the root project folder if you don’t use a /src folder). This is where your template files will be stored. We’ll start by adding a template for rendering single blog posts.
Inside the wp-templates folder, create a single.js file that contains the following code.
import { gql } from "@apollo/client";

export default function SingleTemplate(props) {
	const { title, content } = props.data.post;

	return (
		<>
			<h1>{title}</h1>
			<div dangerouslySetInnerHTML={{ __html: content }} />
		</>
	);
}

SingleTemplate.query = gql`
	query GetPost($uri: ID!) {
		post(id: $uri, idType: URI) {
			title
			content
		}
	}
`;

SingleTemplate.variables = (seedQuery, ctx) => {
	return {
		uri: seedQuery?.uri,
	};
};
Inside of the SingleTemplate.variables function, we pass in the URI of the current page so that it’s available for GraphQL queries to use.
Inside the SingleTemplate.query tagged template literal, we pass the uri for the current page into the GraphQL query, telling WordPress that we want to fetch the title and content for the post matching that URI.
In the SingleTemplate component, we receive the props, destructure the title and content, then return some JSX to render the title and content to the page.
Finally, we have to make Faust.js aware that this template exists. To do that, create an index.js file inside the wp-templates folder with this code inside:
import dynamic from 'next/dynamic';

const single = dynamic(() => import('./single.js'));

export default {
	single,
};
C. Create a catch-all route
Create a [...wordpressNode].js file inside your pages folder. Add the following code to it.
import { getWordPressProps, WordPressTemplate } from "@faustwp/core";

export default function Page(props) {
	return <WordPressTemplate {...props} />;
}

export function getStaticProps(ctx) {
	return getWordPressProps({ ctx });
}

export async function getStaticPaths() {
	return {
		paths: [],
		fallback: "blocking",
	};
}
This catch-all route tells Next.js to use the templates to render pages.
Note that it is still possible to override this with hardcoded pages. For example, if you have a page in your WordPress site with a URI of /about, Faust.js will render that page using the relevant template in your project’s wp-templates folder. However, if you add a src/pages/about.js file to your project, Next.js will render the /about path in your app using that file instead.
D. Test your template
You should now be able to make use of this template.
Run npm run dev to get your Next.js project running in development mode, then visit the URL for one of the blog posts. The default starter blog path in WordPress is the “hello world” one – http://localhost:3000/hello-world/.
If you’ve wired everything up correctly, the page should render and display the post’s title and content.
3. Next steps
You are now ready to leverage Faust’s other features, including: